
How to Safely Clean Car Battery Terminals
Jack Dreyer | Wednesday 29th June 2022 9:00am
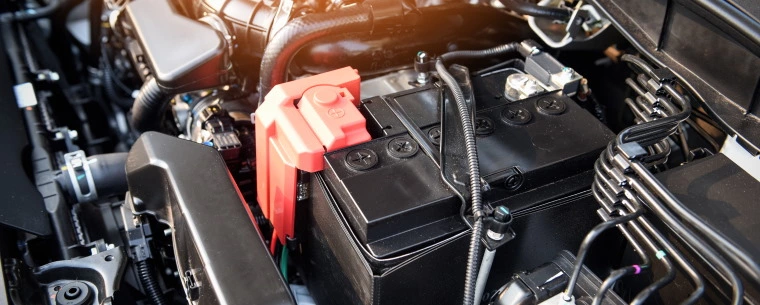
All car components need a little TLC, and your battery terminals are no different. Over time, grime can build up on your car’s battery, sometimes leading to corrosion and even acid leaking from your battery.
To maintain the lifespan of that precious battery, it’s important to keep on top of inspecting and cleaning the terminals. Luckily, depending on the state of corrosion, you can do just that at home! With a few simple steps, let’s get your battery spick and span.
PSA: Keep in mind that this guide is for combustion-engine cars only — you should never attempt to clean the battery of an electric car and would be putting yourself in potentially fatal danger to do so.
What you’ll need to get started
First off, make sure you’re kitted out with all of the equipment you need to do a safe and thorough job. It’s likely that you’ll already have most of these things at home! You will need to find:
- Baking soda
- An old toothbrush
- Water
- Towels/rags
- Protective gloves
- Wrench
- Petroleum jelly (Vaseline)
- A battery brush (optional)
Before you start, ensure that your engine is off and lift the bonnet of your vehicle. Now, visually inspect the battery to ensure that it isn’t cracked or leaking. If it is, we recommend that you don’t start the cleaning process and instead call your local Kwik Fit for a free battery health check.
If nothing is cracked or leaking, you can begin cleaning!
Step 1 – mix your battery cleaning solution
To make an effective at-home cleaning solution, simply mix one heaped tablespoon of baking soda into a pint of water. Stir together until the two are thoroughly combined.
Step 2 – initial scrub & dry
Dip the toothbrush into the solution and begin to scrub the terminals and around the base of the posts, one at a time. Take care when applying the solution that you don’t spill it over other components.
Now, pat them dry with a clean, dry cloth.
This initial clean should help you to remove the terminals from the posts in the next step.
Step 3 – remove the terminals, negative first
Starting with the negative post (marked with a minus symbol and sometimes coloured black), use a wrench to loosen the nut and remove the terminal. Then do the same for the positive post (marked with a plus symbol and sometimes colouored red).
It’s crucial that you take them off one at a time and in this order to keep yourself and your battery safe.
You will likely need to twist and pull in order to get each of the terminals off. If you’re finding this step particularly difficult, you might need to enlist the help of a pair of pliers. When using metal tools, though, ensure that you stay well away from the positive terminal while the negative is still connected.
If you still can’t get the terminals off, they may have corroded severely — give Kwik Fit a call.
Step 4 – clean the inside of the terminals
Now, take a battery brush or your toothbrush and clean the inside of the terminal with your battery cleaning solution.
Rotate the brush back and forth to remove as much corrosion and grime as possible.
Step 5 – scrub the posts
Using the toothbrush and cleaning solution – or a battery brush if you have one – clean the outsides of the posts that were previously covered by the terminals.
Ensure that the two posts are uniformly shiny (or at least, as close to shiny as you can get them!).
Step 6 – clean the top of the battery, rinse, & dry
Using a rag made damp with your cleaning solution, wipe the top of the battery – they’re often surprisingly mucky!
Now that the bulk of the cleaning is done, it’s a good idea to give the battery a ‘rinse’ of sorts by using a damp cloth to wipe it down.
Then dry all components with a towel.
Step 7 – reattach the terminals, positive first
Before you reattach the terminals, it’s a good idea to dab some petroleum jelly (Vaseline) onto them. A little goes a long way here.
This provides lubrication for reattaching and helps prevent corrosion.
Now you’re ready to put the terminals back onto the posts, starting with the positive terminal and then the negative.
Lower your bonnet and you should be good to go!
Failing battery? Give us a call

If you experience any problems with your battery, such as severe corrosion or a flat battery, don’t hesitate to get in touch with your local Kwik Fit.
Check out our blog for info on how to change your car battery and more at-home car maintenance advice!
Any facts, figures and prices shown in our blog articles are correct at time of publication.
Featured Articles
Is it Illegal to Drive With One Headlight?
Saturday 19th July 2025
Wondering if it’s illegal to drive with one headlight? Learn about the safety risks and penalties of illegal blown bulbs and why you should fix them promptly.
Air Con in EVs & Hybrids: Experts Answer Your Questions
Monday 30th June 2025

Does air con drain EV batteries? Can you use the air con while charging an electric car? Find out the answers to these questions & more from Kwik Fit’s experts.
Why Is Your Car Making a Noise? Fixes & Tips
Friday 13th June 2025
When your car starts making unexpected noises, it can certainly be quite disconcerting; it may be nothing to worry about, but here’s what you need to know.


